Showing posts with label Tutorial- Ribbon flower. Show all posts

Tuesday, 8 February 2011

Sweetpea Swap and Ribbon flower Tutorial

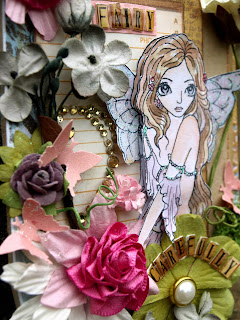
Last post I showed you the wonderful folder sent to me by the very talented Ngaere. Below are photos of the door hanger/ note holder that I made as part of the SweetPea Stamp Swap through the GGS swap site.


 I received the stamped image called 'Wishful Thinking, which was a delightful winged fairy. I decided to use the 'thinking' part of the title to base my creation on.


 Hence the words on my hanger...Sshh..I'm thinking Fairy carefully.


Our 'creation' could be anything at all using our stamped image,, the only stipulation was that it had to be 3D, which suited me just fine because I love to create layers on any project!


One of the ladies wanted to know how I made the ribbon rose. so I will try and explain this as best I can, with the help of lots of photos....

1 - Take a length of ribbon ( I have never measured but I would guess that it needs to be at least 9 inches long, it does not matter if its longer as I snip the spare length off latter on).

2 - Take a needle and thread and fold  over one end of the ribbon, secure the end with a stitch or two.

 3 - Fold the ribbon back onto its self so that you are overlapping the turned over edge slightly (see the photo below). Once again secure with a stitch along the bottom edge. ( looks like the top in my photo but that's just because I've turned it upside down so you can see it better).

 4 - Carry on folding back and securing your length of ribbon, fold by fold.

 5- I stop once my folded ribbon gets to about 4 inches long. If your using wider ribbon you may want to make yours a little longer.

6- Snip off the spare length of ribbon and turn the frayed end under, stitch roughly in place, just to keep it looking tidy.

 7 - Begin to roll your length of folded ribbon and using the same thread catch the fabric with stitches as you go (this is to hold the rolled ribbon in place.)


 8- Keep rolling, and stitching  all the way to the end.

 9 - Once you reach the end tie off your thread

10 - Now simply flip your ribbon over....and volla, you have your ribbon rose.
If any of that does not make sense please PLEASE let me know  :-)
I'm sure many of you have other ways of making flowers, I just sat playng with a length of ribbon one night as I watched tele, and that's what I come up with. Id love to see YOUR ideas.

Thanks for looking

Monday, 5 October 2009

All things spring...

...that's the title of the challenge on at the moment over at Scrap Box

I had this fun snap shot of Cody's pup looking through the kitchen window at this freshly picked bunch of daffodils that I have been planning on scrapping for a little while now so....


.... here is the bright 'spring themed' LO I created for this challenge

Check out the textures
the raffia and crocheted flower
and ribbon flowers hand made especially for my page

Here's how I made these....

Take a length of ribbon about 6 inches long , fold your ribbon in half length wise and hand sew a row of stitches down the entire 6 inch length ( sewing both sides of your folded ribbon together).

Once you reach the end pull the thread (still attached to your needle) so that your ribbon length gathers in.
Next fold your gathered ribbon length in half width wise and stitch the two short ends together.
Repeat all of these steps again, this time using a different ribbon. I have used a narrower velvet ribbon, still 6 inches long.
Once you have your two flower pieces made sew the smaller flower on top of the larger flower and add beads, buttons, or what ever you like to decorate.

I have attached my flowers onto silk flowers on my LO just to add a little more 'pop'!

Add a layer of lace under, or between your two ribbon layers to add more depth and texture, or mix and match ribbon colours, there are so many possibilities! Grab a needle, thread, some ribbon and have a play!
Have Fun!!

My Favorite Musuc

Playlist


Download this mp3 from Beemp3.com

My Scrapping

Here is my finished latest painting

Here is my finished latest painting
This one is a hit with all the males who have seen it. I must say that I did not really enjoy painting a truck and it will be a one off for sure! Uncle David is now the owner of this one. Next project on thepainting scene is going to be a fisherman- for my Uncle Graeme who is wanting me to paint him something. Really need to get onto this one!

Finished at last- I think

Finished at last- I think
At last I think I have pretty much finished this painting for my uncle. Do hope he likes it.

My waterlillies

My waterlillies
one of my recent paintings

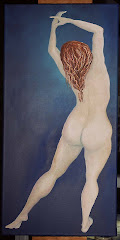
Naked Lady

Naked Lady
One of my last years paintings

Aimee and Bob

Aimee and Bob
A painting I did a while back for my daughter

Click on our house to see a little of where we live.

Thank you

Just want to say thankyou to those of you who have been kind enough to take the time to leave a comment or sign my guest book. Always get a buzz out of knowing people have been here for a wee look! THANK YOU!!

Check out my talented nephew Tony...he's the cool dude singing!